Talking about the guarded fabric and more!
Chapter 2, Part 2: Implement a Guarded Fabric solution
Overview
In this part we will look at shielded and encryption supported VMs and how to create and deploy them, using PowerShell. You can also use Virtual Machine Manager or Windows Azure Pack, but we won’t get into that here.
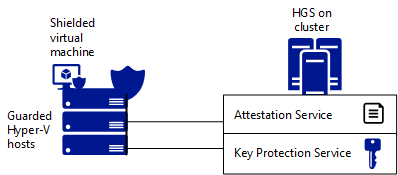
Running shielded VMs consists of two main components:
- The Host Guardian Service (HGS) provides attestation and key protection
- Approved and healthy Hyper-V hosts - also known as guarded hosts

What is a shielded VM
A shielded VM is a generation 2 Hyper-V virtual machine, which is running Windows Server 2012 R2, 2016 (or Linux). It uses Virtulization Based Security and BitLocker Drive Encryption to protect the contents of the machine from fabric administrators. Workload admins use RDP and PowerShell remoting to access the VM as you normally would.
The technologies leveraged are a key protector, a virtual TPM (vTPM, works wether or not the host itself has a TPM-chip) to enable BitLocker and a hardened VM-worker process to encrypt the machines data on the move.
Create a shielded VM using the Hyper-V environment
We can accomplish this task using two different routes:
- Converting an existing, non-shielded VM (which I covered in the previous blog)
- Using a template VHDX
We can use either System Center 2016 Virtual Machine Manager or the Azure Stack, but we can also utilize PowerShell for the task.
On our Hyper-V host, run the following to make sure our link to the HGS cluster is active.
Get-HgsClientConfiguration
We’re going to deploy a new shielded VM by creating the following artifacts on our host:
- Signed template VHDX
- Shielding data file
- Unattend.xml answerfile
First, use powershell to install RSAT
Install-WindowsFeature -Name RSAT-Shielded-VM-Tools
You’ll need to have a generation 2 VM ready to rock, the virtual hard disk file in our example is named template.vhdx - perform the following actions in order to prepare it for shielding:
- Enable and configure RDP and powershell remoting
- Configure windows firewall in correspondence with network security policies
- Encrypt the disk with BDE
If you plan to reuse the VHDX template, you’ll want to sysprep and shut down the VM before moving on.
Then we need to sign our unshielded template disk. In production we’d use a valid cert, but you can use a self signed one for this example:
Protect-ServerVHDX -Path 'C:\vms\template.vhdx' -TemplateName 'ServerOSTemplate' -Version 1.0.0.1 -Certificate $cert
We now have a signed VHDX-template disk.
Creating the shielding data (PDK) file
The PDK file is essentially an encrypted collection of secrets that allows you to shield the VM, link the vm to your HGS cluster and keep sensitive data out of reach of the fabric admin who’s provisioning the vm in the first place.
First create a volumne signature catalog file to ensure the template disk is being tampered with at deployment time
Save-VolumeSignatureCatalog -TemplateDiskPath '.\template.domain.local.vhdx' -VolumeSignatureCatalogPath '.\ServerOSTemplate.vsc'
Then we create an owner certificate.
$Owner = New-HGSGuardian -Name 'Owner' -GenerateCertificates
At this point we need to pull the metadata from our guardian - which translates to - if you have the HGS Guardian enabled on your HyperV fabric, and you have several, you’ll need to download the metadata from the fabric itself or from http://
We then use this metadata xml-file with PowerShell to import the guardian. We do this for each HGS-cluster.
$Guardian = Import-HgsGuardian -Path '.\HGS-Guardian.xml' -Name 'TestFabric' -AllowUntrustedRoot
Then lastly we create the PDK file on the tenant host server
Protect-ShieldingDataFile -ShieldingDataFilePath "template.domain.local.pdk" -Owner $Owner -Guardian $guardian -VolumeIDQualifier (New-VolumeIDQualifier -VolumeSignatureCatalogFilePath '.\ServerOSTemplate.vsc -VersionRule Equals) -WindowsUnattendFile '.\unattend.xml' -Policy Shielded
At this point we are ready to provision our shielded VM.
What is the unattend file
For those of you who read the last command and did not know what the unattend file was/is, this chapter is for you.
The unattend.xml file contains the following secrets:
- Local admin password
- Time zone
- AD DS domain join metadata
- RDP certificate thumbprint and .pfx password

If you want to read more about creating the unattend.xml and how it works, please see this article.
Provision the shielded VM on a guarded host
On the guarded host, install the Guarded Fabric Tools PowerShell module, which contains the New-ShieldedVM cmdlet to simplify the provisioning process. If your guarded host has access to the Internet, run the following command:
Install-Module GuardedFabricTools -Repository PSGallery -MinimumVersion 1.0.0
Save-Module GuardedFabricTools -Repository PSGallery -MinimumVersion 1.0.0 -Path C:\temp\
We can now provision our VM:
New-ShieldedVM -Name 'MyShieldedVM' -TemplateDiskPath 'C:\temp\MyTemplateDisk.vhdx' -ShieldingDataFilePath 'C:\temp\Contoso.pdk' -Wait
If your VM is running a Linux-subsystem, toss a ‘-Linux’ switch on there.
There’s also a Shielded VM Tools feature GUI called the Shielding Data File Wizard located at C:\Windows\System32\ShieldingDataFileWizard.exe
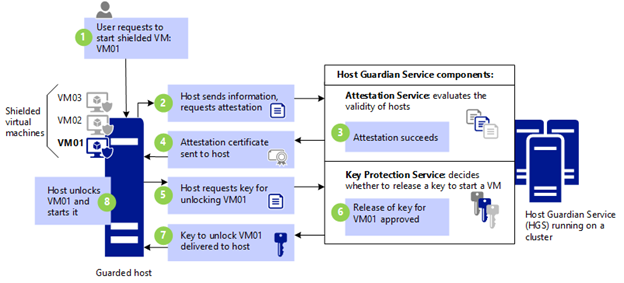
How the shielded VM is powered on

- VM01 is powered on
- Host requires attestation
- Attestation succeeds/fails
- Attestation certificate sent to host
- Host requests VM key
- Release of key
- Host powers on VM01
For more details, please see the part about powering on shielded VMs here.
Isolated user mode
Means that as long as your servers have the Hyper-V role running the OS can store secrets in strongly isolated memory space. IUM, VSM and VBS all refer to the same thing.
Enable and configure vTPM to allow operating system and data disk encryption within a VM
Guardian in the HGS context refers to the HGS cluster, or specifically the certificate based key. We’ll assign a variable named owner to our guardian, which is named owner.
$owner = Get-HgsGuardian -Name Owner
Generate a key protector and associate it with our VM
$kp = New-HgsKeyProtector -Owner $Owner -AllowUntrustedRoot
Set-VMKeyProtector -VmName 'server01.truls.no' -KeyProtector $kp.RawData
Finally, switch on the VTPM in the VM
Enable-VMTPM -VMName 'server01.truls.no'
You can now toggle vTPM support in the settings page of the VM in the Hyper-V manager. vTPM is portable, so your shielded VMs remain protected both at rest (BDE) and while the data is transmitted.
What is an encryption supported VM
It’s almost identical to a shielded VM, with some key differences. A shielded VM enforces no local console in HyperV, no PowerShell Direct, no insecure virtual devices and lastly no copy-function from guest to host and vice versa. These can be enabled, but are not on by default.
Determine requirements and scenarios for implementing encryption supported VMs
There’s not built-in recovery method fto provide console VM access in the event that the workload admins forgot to properly configure remote mgmt on the shielded vms. That’s why you can use encryption supported vms, for businesses that:
- Trust their fabric admins
- Require console acecess to vms
- Can meet their compliance requirements without full vm shielding
So, there’s no good reason to implement this if it’s not a special scenario.
Deploying a encryption supported VM
- Pull down HGS guardian metadata to our workload (tenant) server - HGSGuardian.xml file
- Make sure the VM to be shielded is stopped
- Create a variable to hold our owner (workload admin) certificate
- Import HGS guardian metadata from the previously downloaded xml file
- Create the key protector, which links the owner and guardian together
- Run setvmkeyprotector cmdlet
- Finally, set the security policy
Set-VMSecurityPolicy -VMName 'test.test.no' -Shielded $false
If the -Shielded is $true, it’s shielded, if it’s false, it’s encryption-supported.
Shielded VM connections and recovery
Create a dedicated shielded recovery VM that has nested virtualization enabled, to enable do this:
Set-VMProcessor -VMName <name> -ExposeVirtualizationExtensions $true
- Disable dynamic memory on the VM, allocate enough host RAM to cover any nested VMs you plan to run on the virtual hyper-v host.
- A fabric admin exports the troubled vm’s VHDX file.
- A workload admin rdps into the shielded recovery vm, and import the troubled VM as a nested virtual machine
- Workload admin uses powershell to change the troubled vm from shielded to encryption supported
- Workload admin then establishes a vm connect console session from the recovery vm to the nested, troubled vm and fix the problems
- Fabric admin restores the troubled vm to the fabric and deletes the recovery vm
While this is a hassle, it’s so far the only way (that I know of). This article is what Microsoft has up on the subject.
Links
Guarded fabric and shielded VMs overview
Quick overview from Windows on YouTube
Standard disclaimer
The world of security is always changing and that’s also the case for Microsoft. To follow all their updates, new products, what’s retiring and namechanges please use the following link to stay updated on all their blogs and updates. Here they discuss updated baselines and so much more.