WSUS and more fun stuff!
Chapter 1, Part 2: Implement server patching, updating solutions and malware protection
Overview: Install and configure WSUS
Windows Server Update Services can be deployed many ways. Also included as a part of SCCM. Either as a single server standalone, or a replicated server farm. Secondary (downstream) servers pull their updates from upstream (master) WSUS server; master-servers download updates from Microsoft Update over the internet.

Computer groups will help deploying and testing patches and hotfixes easier. You can have a group a “test servers” as a part of the production enviroment, but with nothing important on to see what implications a patch bring along. Summing up the benefits of WSUS:
- Saving bandwidth because local servers and clients download updates at LAN speed from downstream servers
- Improve stability by first testing, approving and/or blacklisting patches before the computers you support receive them
- Control how and when approved updates are installed in your enviroment
This TechNet-guide is great for getting started, and goes into the technical stuff that I don’t hit on.
Install the WSUS role on a server
You can either use Windows Interal database (WID) or Microsoft SQL server (on server 2016) To install the tools, use the following cmdlet:
Install-WindowsFeature -Name UpdateServices, UpdateServices-WiDB, UpdateServices-Services, UpdateServices-API, UpdatesServices-UI
Open the Windows Server Update Services console from the server manager, this starts the Complete WSUS Installation Wizard
- You’ll be asked for a update storage location, specify your desired path and type run
Post installation tasks take a few minutes, after which you’re taken into a second wizard where there’s a verification step that asks you if WSUS servers firewall rules are configured and you’re logged in with proper credentials. Then we’re presented with the following choices that needs to be made (in some cases ignored):
- Choose upstream server - sync with Microsoft update directly or via a upstream server already configured in the domain
- Specify proxy server - if you’re using one
- Choose languages - select only the languages you support
- Choose products - choose to download updates only for the operating systems and products you support
- Choose classifications - Choose what to download, by default this is critical updates, windows defender malware definition updates and security updates.
- Configure sync schedule - manually specify sync with upstream partner. Choose when to perform the initial sync.
After initial sync completes, you’re ready to define computer groups, apply approval policies and configure automatic update. All of this can be done via the Update Services MMC console
Create computer groups and configure Automatic Update
By default WSUS creates (but doesn’t populate) a single computer group called Unassigned Computers. Let’s create a new group for our infrastructure servers:
- In the Update Services console, right click Computers, All computers node, select add computers group
- Give the new group a descriptive name and click add
Adding computers to the group is a bit hard, we must use a GPO to point our client servers and desktop computers to a given WSUS server. Once that has been done, however, you can reassign the host by clicking the host and selecting change membership.
To point clients and servers to the right WSUS server, go to this GPO:
Computer Config\Policies\Administrative Templates\Windows Components\Windows Update
And to the following:
- Open the Specify Intranet Microsoft Update Service Location and provide the following URLs
- Intranet update service, HTTP(S) address of WSUS server, check IIS to see which port WSUS uses.
- Intranet statistics server, same as above in our case.
In the same GPO path, open the Configure Automatic Updates policy. Here you control how often the targeted hosts query the WSUS server.
Implement Windows Defender
In Windows Server 16 defender behavior is configurable from the Update and Security pane in Settings.
You can control real-time protection (runs defender in the background constantly), cloud-based protection (sends results to windows to help make defender better and faster at detecting), automatic sample submission (submits samples of detected malware to microsoft), exclusions (don’t scan certain files / folders if you’re sure they’re safe), windows defender offline (you can scan the system from an alternative startup volume, but you have to install windows defender offline to do this, version info (how recent is the defitions and signature files.
Running scans from PowerShell
Start-MpScan #to start a normal scan
Start-MpWDOScan #to start offline scan (if you've created an offline boot media).
Please refer to the article on running and reviewing offline scans with Windows Defender for more details. There’s also an overview over different defender cmdlets that might prove useful!
Integrate Windows Defender with WSUS
Configure WSUS to automatically approve windows defender updates automatically.
- Click options node and select Products and Classifications
- Switch to the classifications tab and make sure Definition Updates is selected
- Close dialog and open Automatic Approvals
- Select Default Automatic Approval Rule (or new rule)
- Edit Rule, for step 1, make sure the “When An Update Is In A Specific Classification” is select, in step 2, click “When An Update Is In: hyper-link” and Select “Definition Updates”
Your server should now automatically approve and download Windows Defender definition updates. You can control defender from GPO:
Comp Conf\Policies\Adm Temp\Windows Components\Windows Defender.
Here you can do stuff like enable headless UI mode for users, allow users to pause scans and set time of day to run scans. Headless UI mode refers to update running in background, without bothering the users with pop-ups or information they don’t need.
Implement AppLocker Rules
AppLocker is basically whitelisting. Make sure that AppIDSvc is running on all protected servers, you can use GPOs to force-enable this service. You can have five types of rules:
- Executable rules (.exe and .com type files)
- Windows Installer Rules (.msi and .msp packages)
- Script rules (.ps1, .bat, .cmd, .vbs and .js)
- Package app rules (universal windows apps)
- DLL (dynamic link library binaries - not recommend to use this)
For each rule we have a choice of three conditions:
- Publisher - can match on publisher, product name, file name or file version
- Path - block or allow based on path they’re run out of
- File hash - if the file recieves an update, the rule is useless, but still works for hardened offline systems
To get more into the nitty-gritty and understand AppLocker rules and policies, check out this guide.
Implementing an AppLocker policy
We will try to create an automatically generated rule to whitelist the standard applications and block the firefox browser executable.
First we need to sure AppIDSvc is running, then in GPO editor, navigate to:
Comp Conf\Policies\Windows Settings\Security Settings\Application Control Policies\AppLocker
Right click the Executable Rules node and select Automatically Generate Rules. This allows the following:
- Everyone to run all files located in the Program Files folder
- Everyone to run all files located in the Windows folder
Right click executeable rules and click Create New Rule and change the User or Group scope to Authenticated User:
- On the permissions page, select Deny action
- Under conditions, select file hash
- In the file hash page, navigate to C:\Windows\System32\calc.exe
- Click create to finish making the rule
Then we can use PowerShell to force domain wide gpo-update
invoke-gpupdate -computer $_.name -Force
Log on to a computer and try to run calc.exe, doesn’t work. You can also view this in eventviewer, where you will have four different applocker logs:
- EXE and DLL
- Msi and Script
- Package App Deployment
- Package App Execution
For a reference guide with links to each individual step, check this TechNet-article out!
Implement Control Flow Guard
Control Flow Guard is a developer focused feature. To enable it the creators of .NET software need to enable it in Visual Studio and recompile the program.
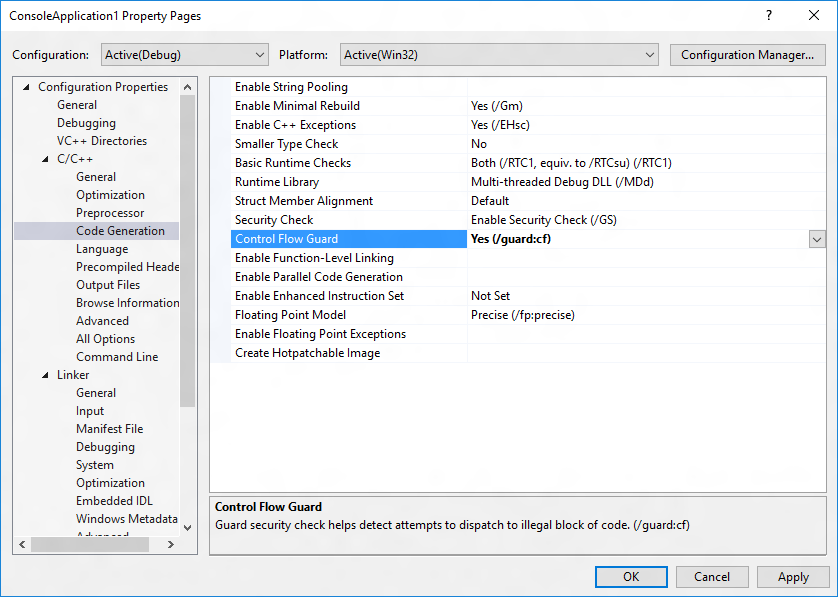
In most cases, there is no need to change source code. All you have to do is add an option to your Visual Studio 2015 project, and the compiler and linker will enable CFG. The simplest method is to navigate to Project | Properties | Configuration Properties | C/C++ | Code Generation and choose Yes (/guard:cf) for Control Flow Guard.

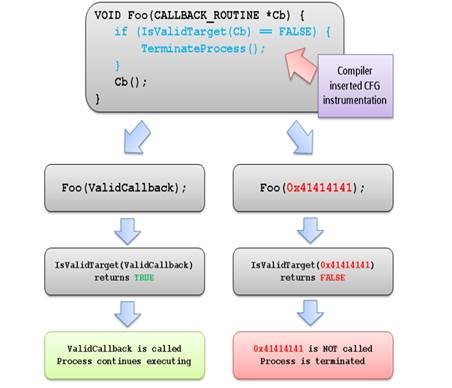
How does it work? Well, when a CFG check fails at runtime, Windows immediately terminates the program, thus breaking any exploit that attempts to indirectly call an invalid address.

Check that Control Flow Guard is enabled on a binary
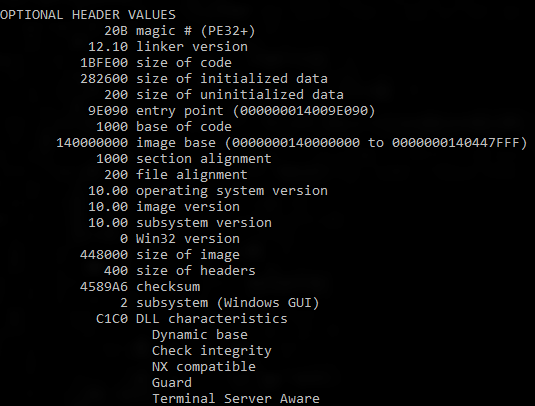
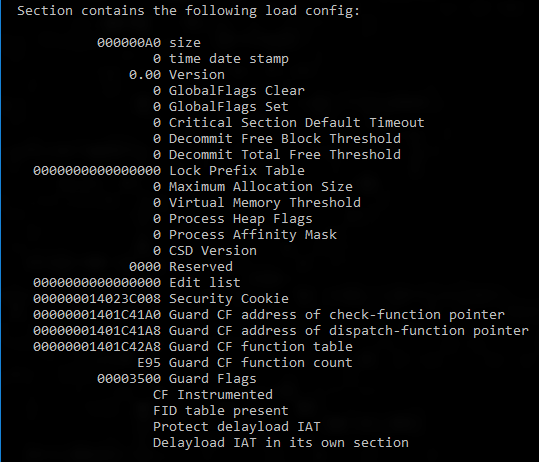
Run the dumpbin tool (included in the Visual Studio 2015 installation) from the Visual Studio command prompt with the /headers and /loadconfig options: dumpbin /headers /loadconfig test.exe. The output for a binary under CFG should show that the header values include “Guard”, and that the load config values include “CF Instrumented” and “FID table present”.


Implement Device Guard policies
Device Guard isn’t a single product, it’s a collection of security-related hardware and software features that fully protects the servers executable environment. This article on demystifying Device Guard and Credential Guard on TechNet explains a lot!
To summarize briefly, device guard consist of three primary components:
- Configurable Code Integrity (CCI).
- Ensures only trusted code runs from bootloader onwards.
- VSM Protected Code Integrity.
- Moves kernel mode CI and hypervisor CI into the VSM, hardening them from attacks.
- Platform and UEFI secure boot.
- Ensures boot binaries and UEFI firmware has been signed and not tampered with.

So, to make it clear, device guard isn’t a single thing, it’s these three components working together to guard your device.
You can manage device guard with:
- Group Policy
- System Center Configuration Manager SCCM
- Microsoft Intune
- Windows Powershell (ConfigCI-module)
This gives us the ability to choose from preference, and also automate a great deal. For more information on how to configure this, see the article above.
Creating Code integrity policy rules
Define the actual application whitelist that is enforced on the target node. Create a “golden” server and workstation images that contain all the signed software and components that are allowed by the policy.
Each server/computer can only have one CI-policy at the time. It’s located at:
C:\Windows\System32\CodeIntegrity\SIPolicy.p7b
Code integrity file rules specify the level at which applications are ided and trusted by Device Guard. Run levels are almost the same as in AppLocker, being Hash, FileName, SignedVersion, Publisher, FilePublisher, WHQL (used to trust windows kernel bins) and WHQLFilePublisher (specifies that bin code must be certifiedby Windows Hardware Quality Labs).
High level steps to deploy a new CI-policy:
- Prepare Golden computer
- From an elevated powershell session, run the New-CIPolicy cmdlet
- Use the ConvertFromCIPolicy cmdlet to convert the ci policy from plaintext xml to binary format
- Audit the policy before applying it in production
- To deploy, enable the Deploy Code Intergrity Policy Group Policy from Comp Conf\Pol\Adm Temp\System\DeviceGuard - this requires you to enter the path to your CI pol file.
- Restart target system and check event log for results (eventviewer). Check the app and services\microsoft\windows\codeintegrity\operational log
Update 12.02.2019
High level steps to deploy CI:
- Group devices into similar roles – some systems might require different policies (or you may wish to enable CCI for only select systems such as Point of Sale systems or Kiosks.
- Use PowerShell to create integrity policies from “golden” PCs (use the New-CIPolicy Cmdlet)
- After auditing, merge code integrity policies using PowerShell (if needed) (Merge-CIPolicy Cmdlet)
- Discover unsigned LOB apps and generate security catalogs as needed (Package Inspector & signtool.exe – more info on this in a subsequent post)
- Deploy code integrity policies and catalog files (GP Setting Below + Copying .cat files to catroot - C:\Windows\System32\{F750E6C3-38EE-11D1-85E5-00C04FC295EE})
End update
Also important to note, as Microsoft likes to change things up, Code Integrity is now known as Windows Defender Application Control or WDAC. Please use this article as reference for the default policy and how to add publishers, merge policies and publish them.
Catalog files
You can store your application whitelisting exceptions in catalog files and device guard whitelists the catalog entries. This can be done with the PackageInspector.exe command line tool. For more information, this series of TechNet How-To topics should be a good start for a great many things.
Enable Device Guard (high level)
- Make sure all systems meet all DG requirements
- System needs to be able to perform virtualization based security (VBS)
- Group devices by their needed degree of control
- Create apropriate OU’s in GPO
- Inventory and review all hardware and software
- If they aren’t signed by a known CA you trust, they won’t work with Device Guard
- Digitally sign all internal applications
Links
TechNet-article on server patching and WSUS
Microsoft security products overview
Standard disclaimer
The world of security is always changing and that’s also the case for Microsoft. To follow all their updates, new products, what’s retiring and namechanges please use the following link to stay updated on all their blogs and updates. Here they discuss updated baselines and so much more.